MCREW
Editing Using Table View
Row and Cell Selection Functions
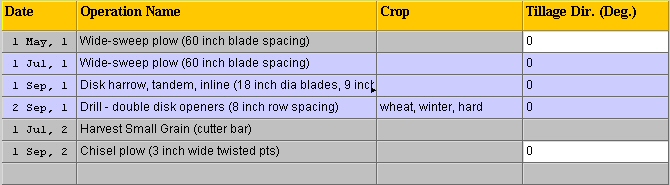
The mouse is currently the primary method used to "select" either a row and/or an
individual table cell. If a particular table cell cannot be directly edited within
the cell, this is indicated by a gray background, (e.g., Date, Operation Name, or Crop)
and the row is selected (indicated by the blue background in all cells within the row).
See the figure below for an example of a row selection after a left mouse click within
the "Drill" operation row.
If the table cell can be directly edited on the table (indicated by a white background
in the table cell), then a left mouse button selection will select the individual cell
and immediately allow the user to manually "edit" the value in the cell. For example,
left clicking in a "Tillage Dir." cell with a white background activates that cell
for editing.
One can select multiple rows at one time by depressing and holding down the left mouse
button on the first row to be selected and dragging the mouse cursor over the additional
contiguous rows to also be selected. Release the left mouse button on the last row to
be selected. All selected rows will be highlighted with a blue background.
The user can append contiguous rows adjacent to a previous, row or multi-row selection, by
holding down the "shift" key and clicking the left mouse button on the last desired contiguous
row to append to the selection. This is similar to how Microsoft Windows append selection
works with the "shift" key depressed.
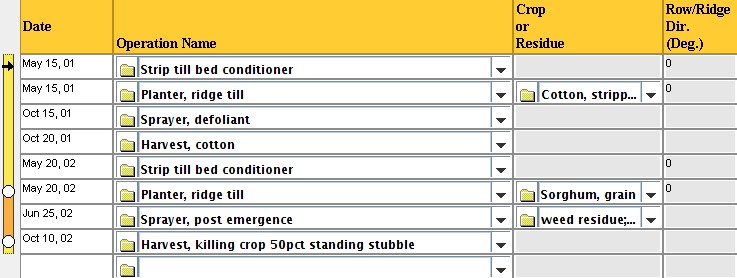
Similarly, one can append non-contiguous rows (or row) by holding down the "ctrl" key and
making an additional multi-row (or single row) selection similar to the original row or
multi-row selection (see figure below). As many non-contiguous rows can be selected,
as desired, via this method. Again this is similar to how Microsoft Windows non-contiguous
selection method works with the "ctrl" key depressed.

Any row or multi-row selection can be de-selected and replaced by simply clicking the left
mouse button anywhere within the MCREW table display (with no keyboard keys pressed).
Row Editing Functions
Using the "Edit" menu, the user can cut, copy paste and delete rows. One can also insert a
new blank row ("Insert Row") immediately above the currently selected row. Additionally,
the user can press the right mouse menu button to display a popup menu that contains row
editing functions. The "Set Date" and "Adjust Date" options
will be described below under "Management File Date Adjustment Functions".
Also, one can insert the contents of another (previously created) management file via the
"Insert Management File" option immediately above the currently selected row. The "FileChooser"
dialog will popup allowing the user to select the desired management file from which to include
all the operations and their associated dates from the selected management file into the current
management file being edited.
Management File Date Adjustment Functions
There are several date adjustment functions available in MCREW available in the "Edit" menu and
the icon toolbar. These operations are:
 Sort by Date
 Cycle Forward
 Cycle Backward
The "Sort by Date" function sorts the management operations by ascending date order. Thus, the user
can adjust/set the dates of management operations without having to worry about whether they are in
the correct sequential order at that time. When the user wants to see the list of operations in the
correct date-ordered format, they can simply select the "Sort by Date" function from the toolbar
icon or the "Edit" menu.
MCREW will not allow the user to save a WEPS management file without the operations being listed in
date order. The user is given the options to automatically sort them, if they are not sorted during
a management file save operation, or to go back to the editor and allow the user to correct the
problem(s) manually.
The "Cycle Forward" and "Cycle Backward" functions will rotate the "rotation year" of the management
operation dates forward or backward in increments of one year. For example, a three year management
file rotation "Cycled Forward" would change the operation dates in the first year to the 2nd year,
those in the 2nd year to the 3rd year and those in the 3rd year to the 1st year. Thus, the crops
grown and harvested in the first year would now occur in the second year, etc. Likewise, a rotation
"Cycled Backward" would shift the rotation the opposite direction, making the 2nd year operations
occur in the first year, etc.
Date Column Editing Functions
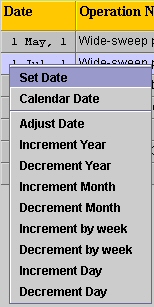
Limited date editing functions are available by right clicking on a cell in any column. Clicking
the right mouse button while the cursor is on a date column cell, causes a date editing popup menu
to appear which has additional date editing functions (see figure above). These functions
allow the user to adjust dates for one row or all operation rows selected (highlighted in blue)
simultaneously (single-row date editing operations are made inaccessible and are greyed out if
multiple rows are selected) . However, the top two items (above the line) are specific to single
rows and if multiple rows are selected, these items will be blanked.

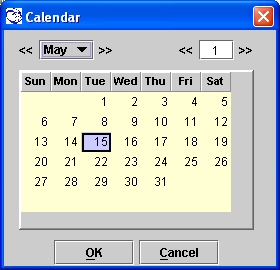
Selecting the "Set Date" option will display a dialog box that allows the user to type in a specific
date (day/month/rotation year) for the selected operation row (highlighted in blue). The figure to
the left shows an example of "Set Date" popup window.
The "Calendar Date" option displays a popup calendar to aid in adjusting dates. Double left mouse
clicking in a date cell, displays the popup calendar as well. This calendar window allows the user
to select the desired date. The calendar allows the user to increment or decrement the month and
year values if desired. Then the day of the operation within that month/year can be selected.
The user can either double right mouse click on the day value or click on the "OK" button to accept
the specified date (see the figure above). The "Calendar Date" function is only applicable
when a single operation row is selected.
The "Adjust Date" function is available from this menu, but year, month, week, and day
increment and decrement functions are also available. They apply to all dates in the rows
that are selected. The user can adjust the operation dates on the selected rows. Selecting
the "Adjust Date" option will display a dialog box allowing the user to adjust the operation
dates in the selected rows by a specified ± number of days, months, or years.
Additional menu options are also available to increment or decrement the dates of selected
rows by day, week, month and year.
Operation Column Editing Functions

Editing functions for the Operation column are displayed by right clicking within the column (see figure above).
Clicking on one of the functions available will apply to the function to the highlighted row(s).
However, the top two items (above the line) are specific to single rows and if multiple rows are
selected, these items will be blanked. The operation drill down screen function is described below.
A new operation can be added to a blank line or a different operation can be selected to replace an
existing operation. This is accomplished by double clicking the left mouse button with the mouse
cursor in an operation cell. This action will display the "File Chooser" dialog. It allows the
user to select a management operation record from within the dialog window. The user can also
access this "File Chooser" dialog from the "Add/Change Operation" menu option via the right mouse
menu (described earlier under "Row Editing Functions"). Other operation column functions allow
the user the option of setting or adjusting the date of the operation or inserting a blank row to
be filled by the user. The user can also insert an entire management file which is useful in
building multiple crop/year rotations. Finally, there are functions that allow the user to cut,
copy, paste, and delete a row or multiple rows.
Crop Column Editing Functions

Editing functions for the Crop column are displayed by right clicking within the column (see figure above).
Clicking on one of the functions available will apply to the function to the highlighted row(s).
However, the top two items (above the line) are specific to single rows and if multiple rows are selected
these items will be blanked. The Crop drill down screen function is described below.
A Crop can be specified for planting (and subsequent harvest) only for operations which contain the
"planting/seeding" process. Those that have this process defined will either display the name of the
crop to be planted in the "crop" column or display the string "no crop", signifying that no crop is to
be planted or it hasn't yet been selected by the user. A crop can be added or an existing crop can be
replaced by double clicking the left mouse button with the cursor in a crop cell. This action will
popup the "File Chooser" dialog. It allows the user to select a crop record from within the dialog
window. The user can also access this "File Chooser" dialog from the "Add/Change Crop" menu option
via the right mouse menu (described earlier under "Row Editing Functions"). Other crop column functions
allow the user the option of setting or adjusting the date of the operation or inserting a blank row to
be filled by the user. The user can also insert an entire management file which is useful in building
multiple crop/year rotations. Finally, there are functions that allow the user to cut, copy, paste,
and delete a row or multiple rows.