|
4
The JClass DataSource Beans
Introduction
Installing JClass DataSource's JAR files
The Data Bean
The Data Navigator and Data Bound Components
4.1 Introduction
JClass DataSource includes nine JavaBeans. Their custom editors simplify the task of making a connection to a database, specifying the master-detail relationships, and binding data-aware components to any level. For designs of the hierarchical or master-detail type,
JCTreeDatais the one to use. Please see Appendix A for a list of properties for the JClass DataSource JavaBeans.Use
JCDatato bind to one or more database tables at a single level.Use
DSdbNavigator(orDSdbJNavigatorfor Swing) as a way of signalling a change to a data pointer. ADSdbNavigatorcan be associated with any level in the hierarchical design that you have defined using aJCTreeData. Its buttons are used primarily to request movement to another row in the level to which it is bound, but it has many more capabilities. These are discussed in the following chapter.The six data bound components
DSdbCheckbox1,DSdbImage,DSdbLabel,DSdbList,DSdbTextArea, andDSdbTextFieldare used to display information in a column or a field at the level to which they are bound. Other components which are also bound to the same source of data, such asDSdbNavigatoror JClass HiGrid, are used to move from one row to another, causing the data bound components to update their displays with the new information.DSdbCheckbox,DSdbTextArea, andDSdbTextFieldare editable components. Changes in their contents are propagated back to the database under the commit policy currently in effect.
DSdbListdisplays a column in the table defined by the current row pointer. It also functions as a navigator. Clicking on one of the items in the list sends a request that the current row pointer be updated. The items inDSdbListare not editable.This chapter describes
JCDataandJCTreeData. The navigator and data bound components are described in the following chapter.The JClass DataSource Beans connect to database drivers. If you are using Windows and you have
ODBCdrivers installed (perhaps as a result of installing your database software), you can set up anODBCdata source and use the JDBC-ODBC bridge. If you haven't done it before, here are the details on setting up a user data source.
- Double-click on
ODBCin the Control Panel. If it isn't already on top, click on the User DSN tab. A list (possibly empty) of User Data Sources is visible.- Click Add... and a setup dialog window appears.
- Type in a Data Source Name and a Description. These names may be anything you choose. The Data Source Name field is what will be displayed in the Name field of the
ODBCwindow when the setup is complete.- In the Database button group, click on Select.... A file dialog appears, allowing you to type in the full pathname of your chosen database, or navigate to it.
- If you need to set a Login Name and Password for your database, click the Advanced... button.
- Click OK on the ODBC Data Source Administrator window to complete the setup.
If the name you chose was
jdbc:odbc:HiGridDBHiGridDB, the URL for your data source is:To load the JDBC-ODBC bridge, you use a driver whose name is:
sun.jdbc.odbc.JdbcOdbcDriver
4.2 Installing JClass DataSource's JAR files
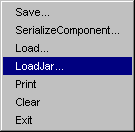
Before getting into the details of the DataSource's JavaBeans, it is important to be able to add these objects to a builder tool. The example chosen is SunSoft's BeanBox. Begin by ensuring that you have installed your JAR files in the proper directory for your development environment. In the case of the BeanBox, this would normally be /bdk/jars. If you prefer to keep your JAR files in another directory, you will have to load them by choosing File > LoadJar... A file dialog appears, permitting you to specify your JAR's directory.
Figure 17 : Choosing LoadJar... from the BeanBox's File menu.
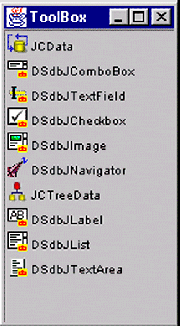
The ToolBox displays the Beans contained in the JAR file once they are loaded. Note that these same files are contained in JClass HiGrid, so if you place a HiGrid Bean in the same environment, you may see a duplicate list of DataSource Beans. It's a good idea to use only one of the DataSource or HiGrid JARs at a time because of their tendency to interact.
Figure 18 : JClass DataSource's Beans, displayed in the ToolBox.
At this point you are ready to add these components to the BeanBox and begin setting them up.
4.3 The Data Bean
Use
JCDatato bind one or more tables at a single level. This Bean is non-hierarchical and is suitable for any application where the data is to be presented all within one non-expandable grid. The fields in the grid may be chosen from more than one database table.
4.3.1 Setting a Data Bean's Properties and Saving Them to a Serialization File
The first step in using this Bean is to add it to your IDE. It is important that you use the JAR corresponding to the data source connection mechanism you intend to use. Use
jcdatasource.jarif you are going to use a connection based on JDBC. If you intend to use an IDE-specific connection, install the JAR whose name includes the initials matching the IDE.We'll use the ToolBox to illustrate the general method. After placing
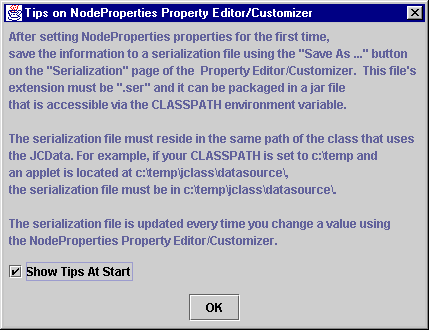
JCDatain the BeanBox, a window opens reminding you to name and save the serialization file.
Figure 19 : The Data Bean tip window: a reminder to save the serialization file.
For more information on saving the serialization file, see Section 4.3.3, Saving a Serialization File.
4.3.2 The Data Bean Editor
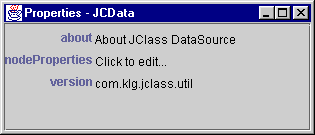
Observe the Property Sheet which opens when
JCDatais placed on the BeanBox. The data Bean's Properties sheet is shown in Figure 20.
Figure 20 : The BeanBox's Properties sheet, showing the properties of the Data Bean.
The middle line has a property called
nodeProperties, whose pseudo-value is Click to edit.... Clicking on this item brings up a custom editor, theJCDataBeanComponent Editor.The
JCDataBean Component Editor contains an array of tabbed dialogs that permit you to set a large number of properties. These are discussed in the following sections.
4.3.3 Saving a Serialization File
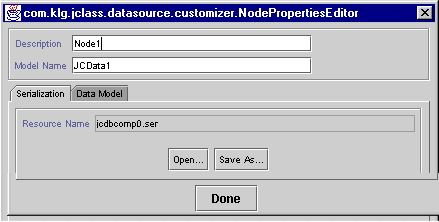
The
JCDataNodePropertiesEditorinitially shows its Serialization tab. Choose a name for the serialization file or use the Save As... button to create the file.
Figure 21 : The Serialization tab of the NodePropertiesEditor.
Once a serialization file has been saved, the property editor updates it as you make changes to any of the properties in the data Bean. When subsequent design changes are made, begin by loading the serialization file. This can save time because it stores all the settings that have already been made.
4.3.4 Making a Connection to a Database
Follow these steps to directly connect to a JDBC driver supported database, or to use an IDE-specific data binding mechanism.
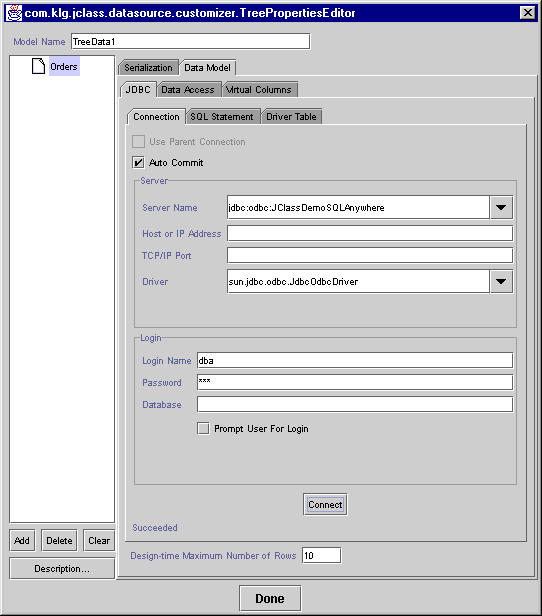
- Click the Data Model tab, exposing another level of tabbed choices.
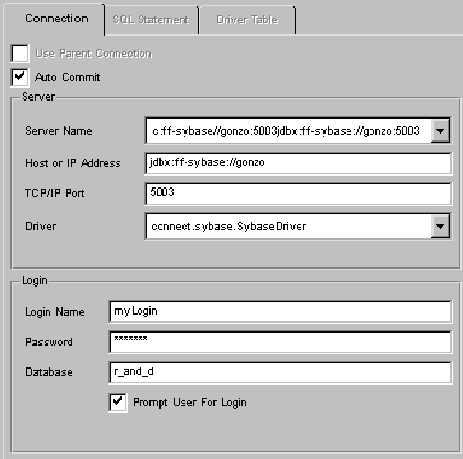
- Fill in the fields in the Connection pane.
- Type the URL and the driver name in the property editor. Leave the other fields blank unless you are connecting to a database or middleware server over a network.
- Click on Connect. There is a message area just below the Connect button that informs you whether the connection attempt was successful or whether it failed and you are in for a troubleshooting exercise.
Figure 22 : The Connection page of the data Bean's custom property editor.
Note that you can set the Design-time Maximum Number of Rows to limit the amount of data that the database must furnish at design-time. This saves time and memory if the query normally returns a large amount of data that is quite unnecessary at design-time.
Using a non-JDBC-ODBC driver
In the case of drivers that require a host address and a TCP/IP port specification, the database name must be given separately, rather than associating it with an alias as is the case with an ODBC setup. Use the following example as a guide when configuring this type of database connection. In the example, the name of the host is gonzo. (The driver is a FastForward type 4 driver for Sybase Sql Server.)
Figure 23 : A database connection that requires every field to be filled in.
4.3.5 Choosing Tables
This section applies if you are using the JDBC connection. After a connection is established, the SQL Statement tab is accessible, as shown in Figure 25.
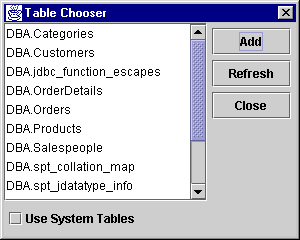
- Click on the SQL Statement tab. There are two scrollable panes. The table selector area is the space reserved for the table or tables that you are going to refer to in the chosen database. After being chosen, the table appears as a scrollable pane containing a list of all its fields. The SQL Statement area is directly below the table selector area.
- Click on Add Table... or right-click in the table selector area and a Table Chooser popup menu appears. Select the database table you want and click the Add button in the Table Chooser window. Notice that a FROM clause naming the table appears in the SQL Statement area.
- Use the customizer to generate SQL statements from mouse actions. See the next section for details.
- To choose more than one table, repeat the process for selecting tables. Click Add for each.
4.3.6 Choosing a Query
The customizer gives you two ways to form a query. You can type the query directly in the SQL Statement area, or you can use the mouse. See Figure 25 to see how a table and its associated query appear in the customizer.
Simple queries for selecting which fields of the table to display are usually accomplished automatically using mouse actions on the SQL Statement tab. Choose the fields by double-clicking on them, or by clicking on the Add Selected Column(s) button. You'll notice that the text for the query appears in the SQL Statement text area as you use the mouse to choose fields. For more elaborate queries, directly type it in the SQL Statement text area. Whatever text appears in this area is used as the SQL statement for retrieving the data from its source.
4.3.7 Joining Two Tables: Driver Table
If your application needs to present information that is stored in more than one table, you can perform a database join on the tables. One simple way is to use the Auto Join feature.
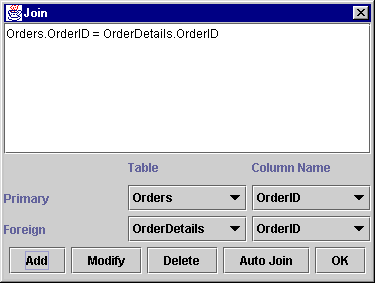
- Click on Add Join in the SQL Statement group of panels. A Join window appears.
Figure 24 : The Join window.
- Select the "Primary" table and the "Foreign" table from drop-down lists.
- Click Auto Join. The customizer looks for a foreign key in the "Foreign" table that matches the primary key in the "Primary" table. If it finds a match it places a WHERE clause fragment in the text area of the Join window.
- Click OK and observe that the complete SQL statement, including the WHERE clause, appears in the SQL Statement panel.
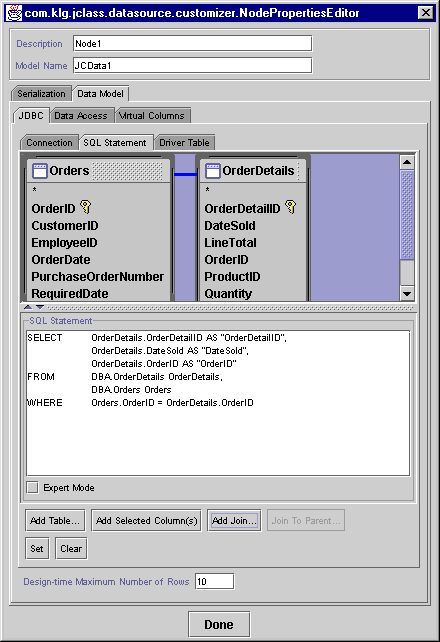
- Save your SQL statement by clicking on the Set/Modify button. Your window will look something like that in the next figure.
Figure 25 : The SQL Statement page, showing a completed query.
Click Done to close the window. The serialization file has captured all the changes so long as the Set button was clicked to save any changes made to the tables, such as which fields are selected and how tables are joined.
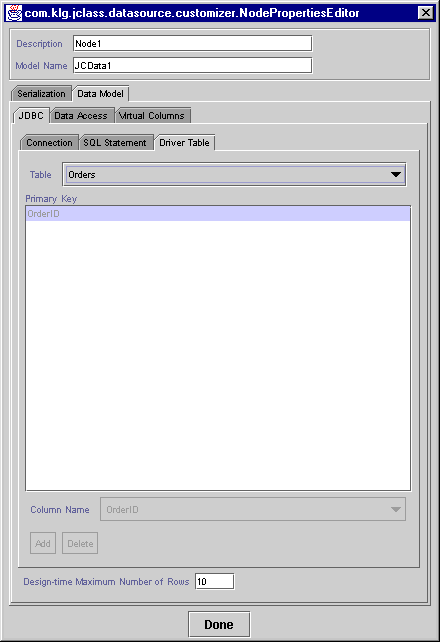
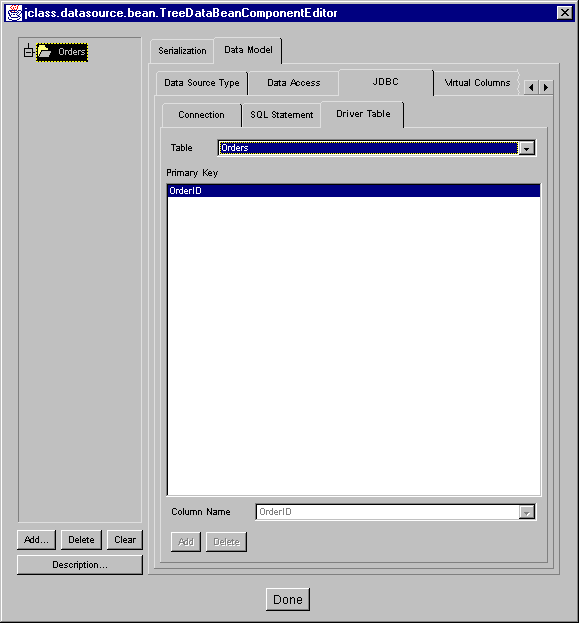
4.3.8 The Driver Table Tab
One of the possible operations on data tables, once they have been retrieved from the database, is the requery of a single row. If a row is formed from the fields of more than one table, the Driver Table is the one whose primary key can be used to drive this type of requery. This is best illustrated with an example.
For the requery to succeed, there needs to be some way of uniquely specifying the row when it contains data from two tables. A specific case, drawn from a sample database, is a join of the Customers table with the Salespeople table. The query that returns the desired result set is:
SELECT Customers.CustomerID AS "CustomerID",
Customers.CompanyName AS "CompanyName",
Salespeople.SalepersonID AS "SalepersonID",
Salespeople.Name AS "Name"
FROM DBA.Salespeople AS Salespeople,
DBA.Customers AS Customers
WHERE Customers.SalespersonID = Salespeople.SalepersonIDFor the requery of a single row to work correctly, we must know that the most restrictive of the two tables is Customers, in the sense that the result set contains rows that have unique CustomerID values. On the other hand, there may be duplicate or repeated values for SalespersonID, so the way to uniquely specify a row is to refine the original query by adding to the WHERE clause the value for the row's CustomerID field.
The Driver Table panel lets you specify which table, and which key, to use when JClass DataSource needs to requery a single row.
If no driver table is chosen, JClass DataSource uses the first table named in the FROM clause whenever it needs to requery a single row.
Figure 26 : The Driver Table tab.
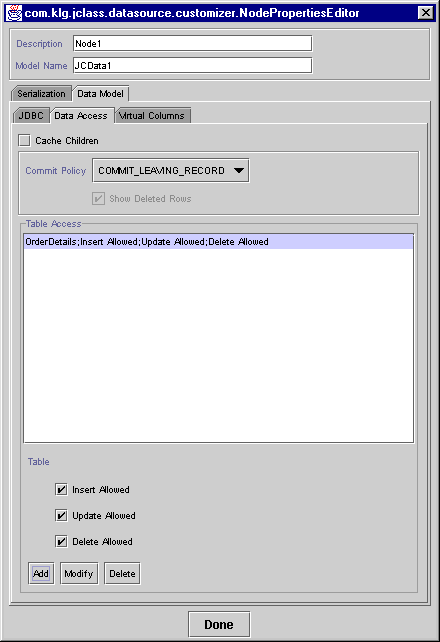
4.3.9 The Data Access Tab
Use this panel to set the overall commit policy and the access rights.
The Commit Policy group has these options:
- The Commit Policy itself has these choices:
COMMIT_LEAVING_RECORD, andCOMMIT_MANUALLY. See the discussion on commit polices in Commit Policy, in Chapter 2, andMetaDataModel.setCommitPolicyin the API.- The Show Deleted Rows checkbox is unused.
The Table Access group simplifies the task of setting access permissions for all three types of SQL update operations. The permissions are set on a per-table basis.
- Choose a table from the Table drop-down list.
- Use the Insert Allowed, Update Allowed, and Delete Allowed checkboxes to set access permissions for the table.
- Click Add to record the settings in the Table Access text area and apply the permissions you have set.
- Choose another table, set permissions using the checkboxes, and click Add.
- To edit any of the settings you have made, select a table, adjust the access permissions and click Modify.
Figure 27 : The Data Access tab.
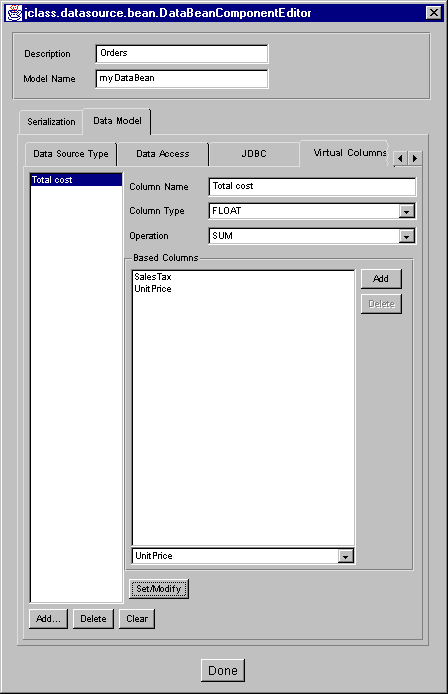
4.3.10 The Virtual Columns Tab
JClass DataSource supports the use of computed fields as well as fields retrieved from a database. Use the Virtual Columns panel to define a computed field that occupies the same position in every row of the chosen table. Use this tab to define additional columns that perform one of the supported types of aggregation: Average, Count, First, Last, Max, Min, and Sum.
Figure 28 : The Virtual Columns tab.
- Decide on a name for your virtual column and type it in the Column Name text area.
- Select the data type from the Column Type drop-down list.
- Select the type of aggregation from the Operation drop-down list.
- Use the drop-down list in the Related Columns area to choose the fields upon which the aggregation will be based. Click Add to place the column in the text area.
- Click Set/Modify to complete the operation.
The example shown in Figure 28 adds a virtual column called TotalCost which is the sum of database fields SalesTax and UnitPrice. The result is shown in the next figure.
Figure 29 : An example of a virtual column whose aggregate type is SUM.
Note that all the fields used by a Virtual Column to generate a value must lie to its left.
4.3.11 Displaying the Result Set
JCDatais ready to execute your query. The result can be displayed using aHiGridBeanor aLiveTableBean. The following steps show how to connect aHiGridBeanto aJCDatain the BeanBox.
- Place a HiGrid JavaBean on the BeanBox. Select the
JCDataand choose Edit > Events > dataModel > dataModelCreated.- Join the BeanBox's rubber band to the HiGrid Bean. Select
dataModelChangedfrom the popup menu. If you don't see this choice it probably means you have selected some other object besides the HiGrid - you have to select its outline, and since the outline isn't visible while you are trying to find it, the operation reduces to a challenge in precise pointing. An event is fired, and the grid is updated. After resizing, you should see the result set from your query displayed in the HiGrid.
4.4 The Tree Data Bean
A
JCTreeDataBean is capable of displaying master-detail relationships in indented tabular form. Its customizer uses the full power of JClass DataSource while making it easy to transfer your hierarchical design to Java code.Placing a
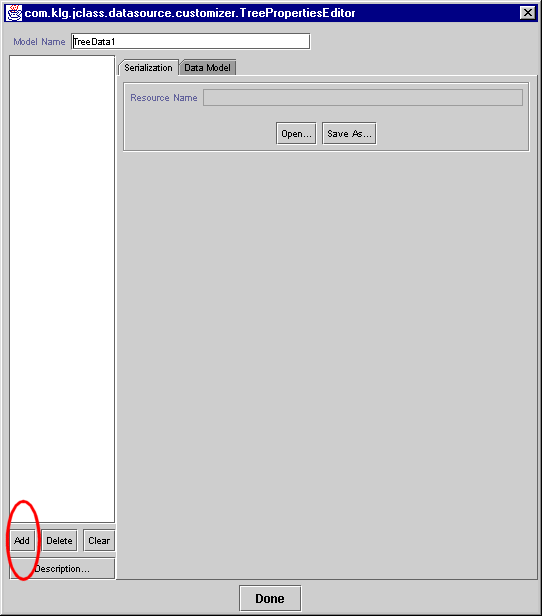
JCTreedata JavaBean on a form is the same as using aJCDataBean. As in the discussion for theJCDataBean, you begin by clicking on the filename at the right of the TreePropertiesEditor label on the JCTreeData Bean's property sheet.This invokes the Tree Properties Editor, the custom editor for this component. The Serialization tab is the same as in the case of the JCData Bean Properties Editor, but the left hand panel has a different appearance. The outliner for the hierarchical design occupies this area. See Figure 30.
Figure 30 : Before a table is added, you are asked to supply a descriptive name.
The database connection is accomplished just as it is in the case of the JCData Bean component. The way that tables are installed is different because you are able to use this Bean to design a hierarchical data model.
Important: To add the parent table to the form, click the Add button at the lower left of the outliner panel. A warning dialog like that shown in Figure 31 appears reminding you to save a serialization file. Type in the name of your root data table (in place of the name Node0) in the upper left-hand portion of the text pane.
Figure 31 : Name the root data table after clicking the Add button in Figure 30.
You have the beginnings of your data design, as shown in Figure 32.
Figure 32 : The Connection tab for the Tree Data Bean component.
At this point the SQL Statement tab becomes active. Click on it and add the OrderDetails table to your form with the aid of the Table Chooser menu. Tables may be chosen by double-clicking on an item, or by highlighting the item and clicking the Add button.
Use the Table Chooser dialog to review a list of all available tables. You can choose more than one table at the parent level, but one of these should be selected as the Driver Table. See Section 4.3.8, The Driver Table Tab, for the step-by-step process.
Figure 33 : The Table Chooser window.
The completed form is shown in Figure 35. A hierarchical data design has been defined and is now ready for connection to an object that can display the results. As in the case with
JCData, aJCHiGridBean is used to display the data.
4.4.1 The Driver Table Tab
If there is more than one table at a given level, a DriverTable should be declared. This is accomplished with the Driver Table tab as shown in the next figure.
The driver table is the one that the database uses to drive the query. If a driver table is not specified in this dialog the database will choose one, but it is not easy to tell which of the candidate tables it will be.
Figure 34 : The Driver Table tab.
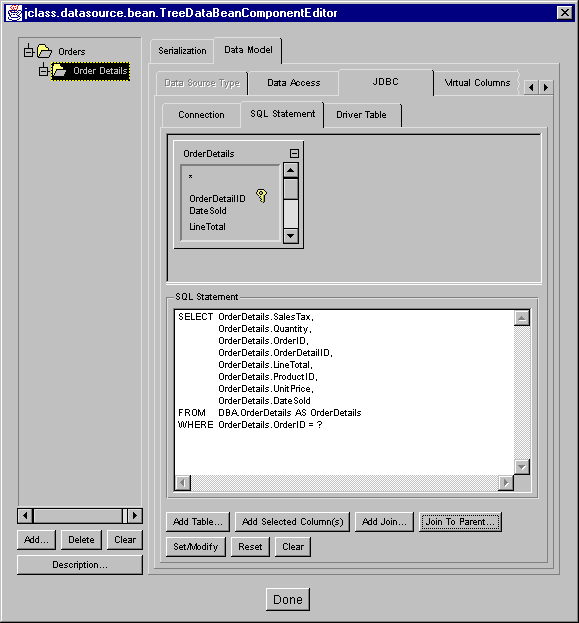
The next diagram shows a completed SQL Statement panel for a sub-table called OrderDetails.
Figure 35 : Adding a detail-level table and selecting a query statement.
The Tree Data Bean may be attached to any component capable of displaying a hierarchical grid, such as JClass HiGrid. It is possible to attach data bound components to any level in the hierarchy.
4.5 The Data Navigator and Data Bound Components
There are several JClass DataSource Beans, including a data navigator and a group of data bound components. The data navigator can be bound to any level in a master-detail hierarchy. Through its row-positioning mechanism, it fires events that notify the other data bound controls that they need to update themselves with the data from the new row.
DataSource's Data Bound Components, in Chapter 5 discusses in detail the navigator and the data bound controls.
4.6 Custom Implementations
4.6.1 Using the DataSource Bean in an IDE
JClass DataSource is designed to be used in an IDE. Use the DataSource Beans' powerful customizers to set up the database connection, build a query in a point-and-click fashion, and bind the retrieved data to a grid, or other data bound component for display. The upcoming section demonstrates the use of such a customizer. It will demonstrate how to add the JAR file to a specific IDE so that you can begin using the JClass DataSource's JavaBeans.
4.6.2 Data Binding in Borland JBuilder
If you intend to use Borland JBuilder's own method of forming a database connection, follow these steps before adding JClass DataSource components to your form:
- After beginning your applet or application, click on the Data Express tab in the Component Palette, select the component labeled borland.sql.dataset.Database and add it to your form.
- A connection window appears. Choose the URL for your database connection or type it in the Connection URL text field. Also supply information for the Username, Password, and Driver class text fields.
- Place a borland.sql.dataset.QueryDataSet on the form. A query window appears. Choose the database connection object from the Database drop-down list and type the query in the SQL Statement text area.
- Now add a JClass data Bean to the form. On the IDE tab, choose Borland JBuilder and type the name of the
queryDataSetobject in the Data Source Name text field.The JClass data Bean is now ready for use within the Borland JBuilder data binding scheme.
1Swing components are designated
DSdbJCheckbox, and so on.
|
|