|
3
Building a Field
Determining Which Technique to Use
Creating a New Field Component (Using an IDE)
Creating a New Field Component (Programmatically)
3.1 Determining Which Technique to Use
JClass Field offers several options when it comes to modifying properties. The choice of technique is a personal preference; however, the following two sections illustrate some important points to consider when deciding which technique to use.
3.1.1 Using an Integrated Development Environment
JClass Field can be used with a Java Integrated Development Environment (IDE), and its properties can be manipulated at design time. Consult the IDE documentation for details on how to load third-party Bean components into the IDE. To modify properties of the component in an IDE, you simply drag the component onto the form, then edit the properties exposed by the Bean and the properties in the DataProperties editor. You can use many of Field's default properties "as is" and set the few that are specific to your application.
3.1.2 Setting Properties Programmatically
Setting properties programmatically requires writing the actual Java code that will accomplish the task. This approach offers more control, because elements not exposed by the Bean model may be accessed.
As mentioned previously, most properties in JClass Field have
TextFieldValueModel.getValue();setandgetmethods associated with them. For example, to retrieve the value of thevalueproperty in aJCTextFieldinstance, do the following:
3.2 Creating a New Field Component (Using an IDE)
The following steps provide an outline for building a new Field component in an IDE.
- Add the field you want to build to your container.
- Set the general bean properties available in the property editor.
- Open the DataProperties editor and select a data type for your field. Now you can test your field by entering data into it.
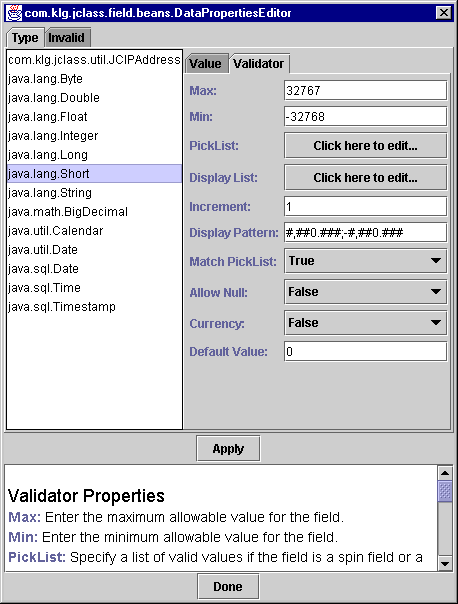
- Set the field's initial value and other properties under the Invalid and Validator tabs in the DataProperties editor. Refer to the bottom panel of the window for descriptive help on the properties.
Since you can associate most validators to most JClass Field components, there are some validator properties that will have no effect on a particular field. For example, although you can set a pick list for a text field, the user will never see the pick list values.
Note that the changes to the JClass Field Component do not take effect until you click Apply and close the DataProperties editor.
Figure 8 : The DataProperties editor.
3.3 Creating a New Field Component (Programmatically)
You might want to use existing JClass Field example code as a starting point for the new object. The examples and demos provided with JClass Field distribution are a good starting point. You can use the following steps as a general outline for creating a field component programmatically or start with the appropriate example field and modify to your specifications.
- Create a container for your new field component.
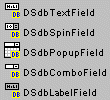
- Declare an instance of the type of field you want (JCTextField, JCSpinField, JCComboField, JCPopupField, or JCLabelField) and add it to the component.
- Select the data type you want to use and declare the appropriate validator as follows:
JC<DataType>Validator val = new JC<DataType>Validator();- Set the validator properties using the Property Summaries tables found in JClass Field's Properties, in Chapter 2.
- If you want to define the behavior of the field when it receives an invalid entry, declare an InvalidInfo object:
JCInvalidInfo ii = NewField.getInvalidInfo();then set the InvalidInfo Properties using the table found in Section 2.4.5.- Associate a value model, and the
validatorand theInvalidInfoobjects with the field, as follows:NewField.setValueModel(new <DataType>ValueModel());You can use the ValueModel declaration to set the initial value for the field.
NewField.setValidator(val);
NewField.setInvalidInfo(ii);- You can also integrate the field with your application by associating it with events and by using utility classes such as
JCPromptHelperandJCFormUtil.
3.3.1 Customizing a New Field Component
Now that you have created your field, you can modify it to suit your specific needs. The following lists present the most common ways to customize a field. Use them as a guide to customizing your field. Example code for some of the methods here appears in chapter 4.
JCString Validator Only
- Specify the valid characters at each position in the field using
setMask().- Limit the number of characters to match with the mask using
setNumMaskMatch().- Put in place-holder characters to provide a hint of the required format using
setPlaceHolderChars().- Provide a list of valid or invalid characters, using
setValidChars()orsetInvalidChars().Numeric Validators Only
- Set the amount by which a spin field will increase or decrease when the user clicks an arrow using
setIncrement().- Format the appearance of the field during and after editing using
editPattern()anddisplayPattern().- Set a numeric field's value to be treated as currency using
isCurrency().- Specify the valid values for a numeric field using
setRange().Date/Time Validators Only
- Set the appearance of date and time fields using
setFormat().- Allow several formats for entering date and time information using
editFormats().Multiple Validators
- Specify values available in a spin or combo component and their displayed values using
setPickList()andsetDisplayList().- Determine whether the user can enter values that are not on the pick list using
matchPickList().- Set a default value for the field using
setDefaultValue().- Specify a case policy of upper case or lower case using
setCasePolicy().JCInvalidInfo Customization
- Specify the behavior of a field when the user enters an invalid value using
setInvalidPolicy().- Specify the colors of the field when it contains invalid data using
setInvalidForeground()andsetInvalidBackground().- Set an auditory warning for invalid entries using
setBeepOnInvalid().Other JCField Customization
- Add prompt text for a mouse-over or for use with
JCPromptHelperusingsetToolTipText().- Determine whether the component is editable using
isEditable().
3.4 Data Binding
JClass Field provides special components that connect and bind to IDE or JDBC-compliant data sources, including the database components that are part of Borland JBuilder 3.0 or later.
Fields are bound to a particular column of a query result set and display the value at the current record. You can enable users to change the value, and have the field validate the change before committing the change back to the database. You can also change the current record displayed in the field programmatically or by using a GUI query navigation component.
Preliminaries
There are five types of GUI components provided for data binding - a text field, a spin field, a combo field, a popup field, and a label field. JClass Field's data-bound Beans dynamically determine their data type at runtime, based on the data type of the column they are bound to.
The Beans are packaged in a separate JAR file for each IDE environment; be sure you are using the correct one for your environment (please see the JClass DesktopViews Installation Guide for details). The following table lists the data-bound Field Beans included with this release:
Note: You must be using Borland JBuilder 3.0 or later to use the "JBdb" IDE-specific Beans. Earlier versions will not work.
Before proceeding, you should ensure that your IDE and database are configured correctly and that you can create simple database applications.
JClass DataSource
JClass DataSource is a platform-independent JDBC-compliant hierarchical data source product. With it, your applications can bind to databases without being locked into an IDE-specific data binding solution.
JClass DataSource is available as part of the JClass DesktopViews product bundle. Visit http://www.quest.com for more information and downloads.
3.4.1 Data Binding in Borland JBuilder
Binding a field to a database in Borland JBuilder involves adding a database connection and query functionality using JBuilder Data Express components, and then using a JClass Field "JBdb" component to connect to the dataset column and display the data. This section walks through these steps.
Note: Database setup, connection, and querying are handled by JBuilder components. Our coverage of these components is only intended as a guide. Consult your JBuilder documentation for detailed information on JBuilder database connectivity.
Step 1: Connect to a Database
Use JBuilder's
DatabaseBean to create a database connection. This component is located on the DataExpress tab in the Component Palette.Add an instance to your frame. Then, use the connection property to specify the URL of the database you want to use.
Step 2: Query the Data
To query the database, add an instance of JBuilder's
QueryDataSet(also on the DataExpress tab) to your frame.Select the columns you want to retrieve with the
select * from OrderDetailsqueryproperty editor. For example, to select all of the columns from a table named OrderDetails, you would use a statement similar to:
You can include all columns at this step, and then use a "JBdb" data-bound Bean to specify the column to display. Each column can be bound to a different "JBdb" field component.
Step 3: Bind a Field to the DataSet
With the database connection established and the query created, you can now add a data binding field Bean and connect it to the JBuilder DataSet to display the data. The data binding properties of the
JBdbTextField,JBdbSpinField,JBdbComboField,JBdbPopupField, andJBdbLabelFieldBeans are dataSet and columnName.
Add a "JBdb" Bean to your frame.
Select a query from the dataSet property's pull-down menu. If the database connection and query are set up correctly, there should be one or more queries in the list.
Then, select the column to display in the field using the columnName property. Enter the column name into the property editor. The case must match that of the column name in the table.
Step 4: Add Navigation Controls (optional)
The field displays the value at one particular record in the table; this is known as the current record. To display the value at another record, add a database navigation component such as the
borland.jbcl.control.NavigatorControlcomponent, and connect it to theQueryDataSet. You should then be able to traverse through the query, displaying each row in your data-bound fields.With your connection established, you can then use the other Bean properties, such as DataProperties, to configure the field's validation behavior. Note that because the data type of a field is determined by the column to which it is bound, you cannot access its type dependent properties in the DataProperties editor until it is bound to a specific column.
3.4.2 Data Binding with JClass DataSource
The third way to add data binding to a JClass Field application is to use the data source components provided with JClass DataSource, a separately-available product from Quest. JClass DataSource is a platform-independent JDBC-compliant hierarchical data source product.
Binding a field to a database with JClass DataSource involves adding a database connection and query using JClass DataSource's
JCDataBean andJCTreeDataBean components, and then using a JClass Field "DSdb" component to connect to the JClass DataSource and display the data. This section walks through these steps using theJCDataBean component.Database setup, connection, and querying are handled by JClass DataSourcee. Our coverage of these components is only intended as a guide. Consult your JClass DataSource documentation for detailed information on configuring its components.
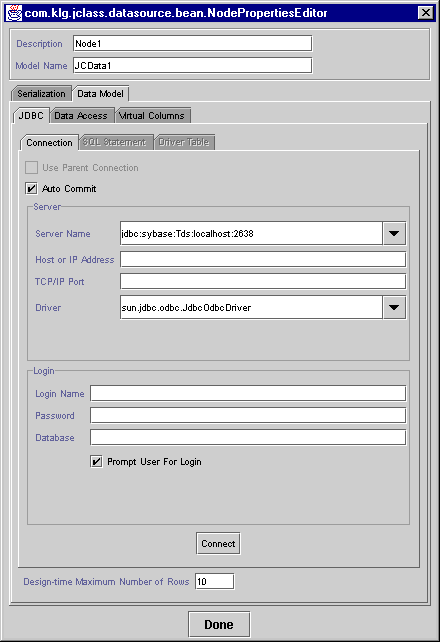
Step 1: Connect to a Database
Add a
JCDataBean instance to your design area.Then, use the dataBeanComponent property editor to specify the URL of the database you want to use and the database query.
The first thing to do is to set up a serialization file under the Serialization tab. This file saves information and settings about the connection. You can then proceed to set up a connection.
To set up a database connection, display the Data Model > JDBC > Connection tab and specify the Server Name and Driver for the database you want to connect to. Test the connection. When the connection is successful you can proceed to set up a query. The JClass DataSource documentation contains complete details on using the dataBeanComponent property editor.
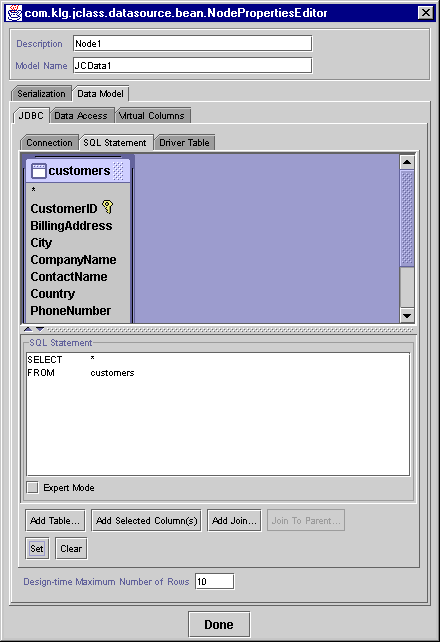
Step 2: Query the Data
Display the Data Model > JDBC > SQL Statement tab to show the query options:
You can create your entire query using mouse clicks (or you can enter it directly in the text window if you are proficient with SQL). First, add a table, and then create a query by selecting columns. When you have built the query, click Set/Modify and then Done.
You can include all columns at this step, and then use a "DSdb" data-bound Bean to specify the column to display. Each column can be bound to a different "DSdb" field component.
Step 3: Bind a Field to the Data Bean
With the database connection established and the query created, you can now add a data binding field Bean and connect it to the JClass DataSource
JCDataBean to display the data. The data binding property of theDSdbTextField,DSdbSpinField,DSdbComboField,DSdbPopupField, andDSdbLabelFieldBeans is dataBinding.
First, add a "DSdb" Bean to your design area.
Click the dataBinding property to display its property editor. If the
JCDataBean's database connection and query are set up correctly, there should be one or more queries in the list.
Double-click a query to display the available columns. Select the column to display in the field and click Done.
Step 4: Add Navigation Controls (optional)
The field displays the value at one particular record in the table; this is known as the current record. You need to use a database navigation component to traverse to another record and display that value. JClass DataSource provides a
NavigatorBean that you can use for this purpose.Add a
DSdbNavigatororDSdbJNavigatorto the design area and connect it to theJCDataBean. You should then be able to traverse through the query, displaying each row in your data-bound fields.With your connection established, you can then use the other Bean properties, such as validator, to configure the field's validation behavior. Note that because the data type of a field is determined by the column to which it is bound, you cannot access its type dependent properties in the DataProperties editor until it is bound to a specific column.
Examples
JClass Field includes several sample programs that work with JClass DataSource, located in examples/field/db.
3.5 Handling Two-Digit Year Values
An application can use JClass Field to display and store abbreviated year values. For example, June 15, 1966 could be displayed as "15/06/66" in a date-type
JCTextField.Using two-digits for year values introduces an ambiguity about which century or millennium the date applies to, especially near the beginning or end of a century. That is, "15/06/66" could be interpreted as either June 15, 1966 or June 15, 2066.
The best approach for avoiding Year 2000 problems in your application is to use four digits to specify year values. If this is not possible, JClass Field provides a
milleniumThresholdproperty that you can use to interpret two-digit years.Located in the
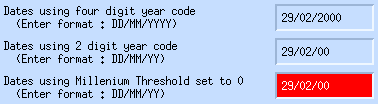
com.klg.jclass.field.validate.JCDateTimeValidatorclass,milleniumThresholdcontrols the interpretation of two-digit years. Any two-digit year less than the value of this property is considered to be after the year 2000, while any value greater than or equal to the threshold is considered to be after the year 1900.The default threshold is 69. This means that a year value of "95" is treated as 1995 and a "01" value is treated as 2001. The following image shows the effect of using milleniumThreshold (the bottom field is invalid because 1900 is not a leap year).
Figure 9 : Four-digit year (top), two-digit year 2000 date (middle), and two-digit 1900 year (bottom).
|
|