  
|
2
Properties of JClass HiGrid
Introduction
Programming JClass HiGrid
Data Rows and Summary Lines
JClass DataSource Events and Listeners
2.1 Introduction
The various tables that comprise a database are unstructured in the sense that any one of them can be chosen for display through some sort of data "control." Moreover, what is or is not a dependent table, and which fields are of interest, usually depends on some particular user's information needs. This structural design is up to you. Once it is completed and the table dependencies and relevant fields are established, you use JClass HiGrid to connect to the data source and display the results.
All of the database model-related code is contained within JClass DataSource, which is included with JClass HiGrid. You can use HiGrid's customizer, described in the next chapter, to get an IDE to assist you in producing the code to connect to a database, then define the tables, fields, and joins that define the hierarchical structure and its contents. This chapter takes more of a programming-related standpoint. If you are interested in a pictorial run-through of the steps necessary to connect to a database, define meta data levels, and format both data and summary rows, read JClass HiGrid Beans, in Chapter 3, first.
2.2 Programming JClass HiGrid
You set JClass HiGrid's properties programmatically by referring to its API. The next chapter shows how properties are set using a customizer. This design-time tool is a convenient way of setting the properties because a builder tool assists you in creating the underlying code.
The basic steps required to create a grid are:
This chapter is devoted primarily to issues relating to the appearance of the grid and the outline of the event handling mechanism. An example of how to specify a database connection without the aid of the customizer is given next, and in The DemoData Program, in Chapter 9. Refer to JClass DataSource Overview, in Chapter 5, for details on specifying the meta data and formulating SQL queries.
2.2.1 Disposing a Grid
Your application may make use of multiple instances of JClass HiGrid objects. Keeping references to grid objects once they are no longer needed is, in effect, a memory leak. You can recover memory by deleting all references to unused grids. Use the
dispose()method inHiGridfor this purpose.
2.2.2 Associating the Grid to a Data Source using JDBC or JDBC-ODBC Drivers
The section on Loading and Registering a Driver in the JClass DesktopViews Installation Guide showed how to register a Type 1 driver. It is possible to get an uninitialized connection object using
c = new DataTableConnection(jclass.datasource.jdbc.DataTableConnection's zero-parameter constructor, but it is much more common to supply the driver, URL, login name and password, and the database name when calling the constructor to instantiate a connection. An example of loading a Type 4 driver follows.
"com.sybase.jdbc.SybDriver", // driver
"jdbc:sybase:Tds:localhost:1498", // url
"dba", // user
"sql", // password
"JClassDemoSQLAnywhere"); // databaseThe String containing the data source name has the form of a URL:
jdbc:sybase:Tds:localhost:1498The subprotocol and subname vary from one supplier to another, depending on whose is used. The JDBC
com.sybase.jdbc.SybDriverDriverManageruses the subprotocol as part of its choice of driver. Other common names for the subprotocol are "Oracle" and "odbc". The location of the driver itself must be specified by giving its path, which in this case is:
2.3 Cell Formats and Cell Styles
A cell consists of a border area and a drawing area. Typically, the drawing area contains textual information retrieved from a field in a database, but cells in header and footer rows, before detail and after detail rows, and even summary columns appended to record rows usually contain information computed from the contents of a number of fields. All these have diverse formatting requirements. JClass HiGrid provides a suite of cell editors and renderers suitable for most purposes.
All cells that contain information extracted from a database have a data type corresponding to that in the source. Other Java data types are included so that cells can contain a wide selection of data types. The supported values in JClass HiGrid are
MetaDataModel.TYPE_BIG_DECIMAL,TYPE_BYTE,TYPE_BYTE_ARRAY,TYPE_DOUBLE,TYPE_FLOAT,TYPE_INTEGER,TYPE_LONG,TYPE_OBJECT,TYPE_SHORT,TYPE_SQL_DATE,TYPE_SQL_TIME,TYPE_SQL_TIMESTAMP,TYPE_STRING, andTYPE_UTIL_DATE.Normally, all cells have the same insets and border style, chosen from a predefined set. Possible border styles are
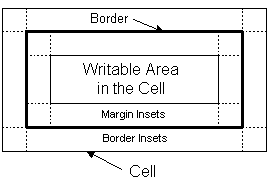
jclass.higrid.Border.NONE,ETCHED_IN,ETCHED_OUT,IN,OUT,PLAIN,FRAME_IN,FRAME_OUT,CONTROL_IN, andCONTROL_OUT. There are two sets of insets defined for a cell. Conceptually, border insets define the placement of the border within a cell no matter what border style is chosen. Margin insets define the writable area within the border, usually chosen so that text will not seem to crowd against the border.Insetobjects comprise four independently settable parameters for the number of pixels to reserve as unused space within the top, left, bottom, and right edges of the enclosing rectangle. The four parameters are normally chosen to be equal because a centered writable area generally has the best appearance.
Figure 11 : Border insets and margin insets.
Note: The class constants that describe border styles are named for the way the cell appears within its border. For instance,
Border.ETCHED_INis the constant for the case where the cell appears etched in with respect to the border.JClass HiGrid provides three parameters to position contents horizontally within the cell,
com.klg.jclass.cell.JCCellInfo.LEFT,CENTER, andRIGHT. To position a cell's contents vertically, usecom.klg.jclass.cell.JCCellInfo.TOP,CENTER, orBOTTOM.Cell editors need to decide how large they should be in relation to the size of the cell they are editing. Normally, a cell's editor will adjust itself to the display size of the cell, but this is not always possible, so HiGrid defines three possibilities:
EDIT_SIZE_TO_CELL, which fits the cell editor to the cell size,EDIT_ENSURE_MINIMUM_SIZE, which uses the cell editor's minimum size (the default), andEDIT_ENSURE_PREFERRED_SIZE, which uses the cell editor's preferred size. These policies can be independently applied to the cell's height and width attributes.You can provide an indication that a cell is too small to completely display its contents. The small marker arrows are called clip hints. In Figure 12, if the arrow at the far right is showing, it indicates that the width of the cell is too small, and the double arrows indicate that the cell's height is too small. Whether or not these arrows appear is under your control. The possible values for clip hints are
SHOW_NONE,SHOW_HORIZONTAL,SHOW_VERTICAL, andSHOW_ALL. These constants are defined incom.klg.jclass.cell.JCCellInfo. The position of the clip hint icons depends on whichCellInfopositioning parameter is in effect.
Figure 12 : The icons that indicate that a cell's contents have been truncated.
There's much more to cells, including cell editors and renderers. See Displaying and Editing Cells, in Chapter 4, for more information.
2.3.1 Properties of JClass HiGrid's CellFormat Class
The table shows the property names in the
CellFormatclass for which get and set methods exist. The property's return type and default value are listed as well.If you wish to apply a new cell style to a group of cells, use the
CellStyleclass. It does not contain any dependency on the data in the cell, making it easy to copy a style to other cells. To apply your own styles to the different types of rows in JClass HiGrid, subclassDefaultHeaderCellStyle,DefaultFooterCellStyle,DefaultBeforeDetailsCellStyle,DefaultAfterDetailsCellStyle, andDefaultRecordCellStyle.
2.3.2 Setting Border Styles
From the table you see that cell border styles are set using
setBorderStyle. Border styles, like the numerous other cell properties, are applied to individual cells. There is a convenience method in theRowFormatclass, again calledsetBorderStyle, that lets you set the border style for the chosen row type, including its edit status cell. If you wish to set the border style globally for all rows, including records, headers, footers, and so on, you can follow the procedure outlined inFormatNodeExample.java. This example program injclass.higrid.examplesshows how to recursively walk the grid's format tree to set border styles. The example program'ssetBorderStylemethod callsCellFormat'ssetBorderStylemethod, but it could call any other method that changes cell properties, making global changes to them.If you are using an IDE, you can use the customizer to set border styles for row types. See Setting General Column Properties, in Chapter 3.
2.4 Data Rows and Summary Lines
Besides presenting rows of data retrieved from database records, you can organize the tables into groups that both label and summarize what they contain. Four types of rows are available for this purpose. A table is usually introduced by a header row that by default contains the database record names for its columns. A footer row is often used to summarize the data in one or more columns, for instance by totaling the cost of all the individual entries in a cost_price column. Two other row types, before details and after details, are available. They provide another level where you can place summary data.
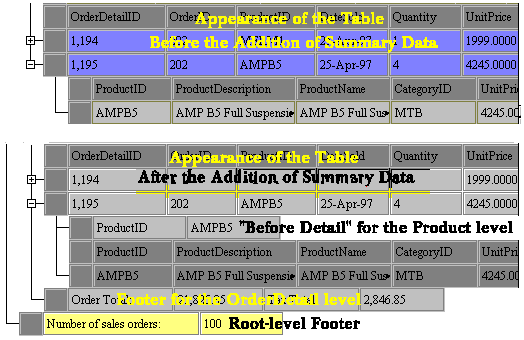
Figure 13 : Appearance of the grid before and after the addition of summary data.
The remaining type of row is the data row: the one containing fields extracted from tables in the underlying data source. This section describes the formats that you can apply to these rows and shows, via code snippets, how you can add summary lines to your grid.
2.4.1 Row Formats
Row formats help you to display your hierarchically structured data design in a visually appealing way. Sub-tables are indented with respect to their parents, but they may be color coded and formatted to make them stand out, or to emphasize their relationship with their parent.
Rows begin with a default height, but may be changed if height sizing is allowed. The row width is simply the sum of the widths of all the cells in that row. The cell width depends on its contents. Re-sizing may be permitted. A row of a sub-table is indented by a default amount, but the indentation may be changed by the application.
2.4.2 Header and Footer Formats
Header and footer formats are described by classes
HeaderFormat,FooterFormatandFooterMetaData. You have the choice of making headers repeat or not. The default is to show the header only once, at the top of the first group of rows. This means that if a header is applied to the rows of the root table and some of that table's children are exposed, there will be a header at the top of the root table but no header will be present when the root rows begin again following the child rows. On the other hand, ifsetRepeatHeaderis true, each group of the rows at the level for which this property is set has an identical copy of the header row introducing it. There can be only one footer row for a root-level table. If a footer is added to a sub-table, there is a footer row associated with each of these tables. Footer rows are made visible by callingsetShowing(true)on theRowFormatobject for the node in question.The width of a header cell is determined by its associated cell in the data row, but the height, border style, and font attributes can be specified independently.
Footer rows are created on a per-table basis. At any given level, you cannot arrange for some rows to have footers and others not. Since footer rows may contain computed data, their meta data description is common to all of them but the contents of their cells will in general be different.
2.4.3 Adding Custom Headers and Footers
You can include headers and footers for each node in the meta data structure. The code examples in Section 2.4.5, Adding Summary Lines, show how a footer can be placed under each of the group of rows that comprise the second child of the root table. The overall design is shown in Figure 8 in JClass HiGrid Overview, in Chapter 1.
Column headers may be set using
setColumnLabel()method.This allows you to supply your own custom labels rather than relying on the database table name for that column.
2.4.4 Before Detail and After Detail Formats
Before Detail and After Detail rows are rows of one level that encompass all the children of the next level. This distinguishes them from headers and footers, which always surround a single table rather than a group of tables. The top level cannot have before and after detail entries because it there is no parent with which they may be associated.
2.4.5 Adding Summary Lines
The points to consider when you are thinking of adding summary information to the tables and sub-tables in your grid are:
- Ensure that the information will be visible - this step is important because summary rows are not visible by default.
- Decide what information each summary cell will contain and how the information should be ordered.
- Create the group of column objects dictated by your design. Typically, the design will include paired columns: a column containing a label introducing a column containing computed summary information.
- Create the summary column.
After you have decided what information you wish to generate and have chosen a layout, you begin your program by organizing the various objects that you need. First, obtain the format-tree root object of your grid.
...
// Assume a HiGrid called "grid" has been instantiated
// and get the root of its format tree
...
FormatTree formatTree = grid.getFormatTree();
FormatNode node = (FormatNode) formatTree.getRoot();Next, get the meta data model for the root level, the row format object for its footer row, and the summary meta data for the footer.
MetaDataModel ordersMetaData = (MetaDataModel) node.getRecordFormat().getMetaData();
RowFormat ordersFooterFormat = (RowFormat) node.getFooterFormat();
SummaryMetaData ordersFooterMetaData = (SummaryMetaData) ordersFooterFormat.getMetaData();Declare more variables that will be needed.
MetaDataModel orderDetailMetaData = null;
RowFormat orderDetailFooterFormat = null;
SummaryMetaData orderDetailFooterMetaData = null;
RowFormat orderDetailBeforeDetailsFormat = null;
SummaryMetaData orderDetailBeforeDetailsMetaData = null;Navigate to the node at which you want to place a footer.
TreeIterator ti = node.getIterator();
if (ti.hasMoreElements()) {
node = (FormatNode) ti.nextElement(); // first child: Customers
node = (FormatNode) ti.nextElement(); // second child, OrderDetails
orderDetailMetaData = (MetaDataModel) node.getRecordFormat().getMetaData();
orderDetailFooterFormat = (RowFormat) node.getFooterFormat();
orderDetailFooterMetaData = (SummaryMetaData) orderDetailFooterFormat.getMetaData();
orderDetailBeforeDetailsFormat = (RowFormat) node.getBeforeDetailsFormat();
orderDetailBeforeDetailsMetaData = (SummaryMetaData) orderDetailBeforeDetailsFormat.getMetaData();
}Set up a footer for the root level.
SummaryColumn column = null;
column = new SummaryColumn("Number of sales orders:");
ordersFooterMetaData.appendColumn(column);
"OrderID",
SummaryColumn.COLUMN_TYPE_AGGREGATE,
SummaryColumn.AGGREGATE_TYPE_COUNT);
ordersFooterMetaData.appendColumn(column);
formatTree.setSummaryFormat(ordersFooterFormat,
ordersFooterMetaData);
ordersFooterFormat.setVisible(true);Set up a footer for the second child of the root node.
column = new SummaryColumn("Order Total: ");
orderDetailFooterMetaData.appendColumn(column);
column = new SummaryColumn(orderDetailMetaData,
"LineTotal",
SummaryColumn.COLUMN_TYPE_AGGREGATE,
SummaryColumn.AGGREGATE_TYPE_SUM);
orderDetailFooterMetaData.appendColumn(column);Compute the sum you wish to display.
column = new SummaryColumn("Tax Total: ");
orderDetailFooterMetaData.appendColumn(column);
column = new SummaryColumn(orderDetailMetaData,
"SalesTax",
SummaryColumn.COLUMN_TYPE_AGGREGATE,
SummaryColumn.AGGREGATE_TYPE_SUM);
orderDetailFooterMetaData.appendColumn(column);Set the summary format and make sure the row will be visible.
formatTree.setSummaryFormat(orderDetailFooterFormat, orderDetailFooterMetaData);
orderDetailFooterFormat.setVisible(true);Set up the Before Details for the same node.
column = new SummaryColumn("ProductID");
orderDetailBeforeDetailsMetaData.appendColumn(column);
column = new SummaryColumn(orderDetailMetaData, "ProductID", SummaryColumn.COLUMN_TYPE_DATASOURCE);
orderDetailBeforeDetailsMetaData.appendColumn(column);Set the summary format and make sure the row will be visible.
formatTree.setSummaryFormat(orderDetailBeforeDetailsFormat, orderDetailBeforeDetailsMetaData);
orderDetailBeforeDetailsFormat.setVisible(true);Regenerate the run-time grid. This refreshes all the information needed to display the grid. If you are adding summary columns dynamically to an already existing grid, the run-time grid needs to be refreshed by the following command:
grid.resetRuntimeGrid();The result is shown in Figure 14. The root-level footer contains two cells, the first being a label, and the other an aggregate that counts the number of sales orders. The footer for the second level contains two aggregates, one for the total dollar value of sales orders and the second for the total tax.
Also shown is a Before Detail row for the second node of the first sub-level. Note that even though its association is with the first sub-level, it makes its appearance just before the third level headers. Before Detail and After Detail rows are not visible until the sub-level to the one with which they are associated is opened.
Figure 14 : Adding a footer to the root level and summary data to a sub-table.
In short, the sequence is: get the meta data for the summary row, define a new column cell based on the type of data it is to contain, append the cell, set the summary format, ensure that it is visible, then reset the runtime tree.
2.4.6 Computed Summary Information
The easiest way to compute summary information is to override the
public void calculate(RowNode rowNode) {calculatemethod of theAggregateclass, just as do all the aggregate classes with predefined operations, such asAggregateMax. Since you need to have an implementation of theAggregateinterface, you provide a new subclass that extendsAggregateAll, and override thecalculatemethod there.
if (isSameMetaID(rowNode)) {
Object quantity = getRowNodeResultData(rowNode, "Quantity");
Object unitPrice = getRowNodeResultData(rowNode, "UnitPrice");
if (quantity != null && unitPrice != null) {
double amount = getDoubleValue(quantity) *
getDoubleValue(unitPrice);
addValue((Object) new Double(amount));
}
}
}The way that this code is reached is to name the class in which it resides. Assume that the name of the class is
column = new SummaryColumn(orderDetailMetaData,OrderDetailTotalAmount. Your calling method would issue a command like
"jclass.higrid.examples.OrderDetailTotalAmount",
SummaryColumn.COLUMN_TYPE_UNBOUND,
SummaryColumn.AGGREGATE_TYPE_NONE,
MetaDataModel.TYPE_DOUBLE);Note the second parameter. Where there would be a columnID name if one of the predefined aggregate types were going to be used, there is a path name to the class that performs the special calculation. As always, the CLASSPATH variable is used to provide the first part of the path. The other parameters are chosen to be consistent with unbound data and the data type of the result of the calculation.
2.4.7 Managing the Visibility of Rows
By default, a new grid shows only the root level. If you wish to expand other levels, use
grid.getRowTree().openFolder(grid.getCurrentRowNode());openFolder. For instance, if you wish to open the first level on the first row, use:If you want to open a row further down the hierarchy, you first need to navigate to that level. The row tree contains the row organization for the grid. It is analogous to the data table tree in JClass DataSource.
2.4.8 Moving Between Rows
The grid has a concept of a current row and various methods are available to move the current row pointer. All of these ultimately rely on the existence in the data model of a bookmark. The way that the data model keeps track of its records is described in The Data Model, in Chapter 6. In brief, there is a unique bookmark for every row. There is one cursor per table. The cursor is used to decide where the current row in the table should be. Also, an index is used to number the rows of a data table. At all times, one row of the grid is deemed to be the current row.
In general, moving to another row presumes that you already know its bookmark.
The
DataModelinterface's methodmoveToRowis used to tell this data model which row should be marked as current. Depending on the commit policy, moving the internal cursor may automatically commit changes to the originating data source.The
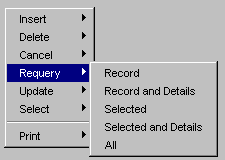
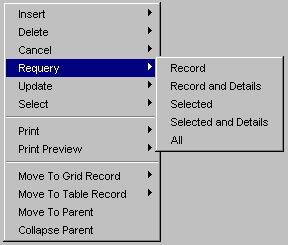
com.klg.jclass.datasource.DataTableModelinterface declares methodsabsolute,next,previous,first, andlast, which manipulate bookmarks and cursors. These are implemented incom.klg.jclass.datasource.BaseDataTable,com.klg.jclass.datasource.beans.JCData, andcom.klg.jclass.datasource.util.NavigatorDataBinding. As the selected row moves around in a table, the cursor's value changes, but this is independent of the bookmark values.There are menu choices in the edit popup menu corresponding to these motions. The following table lists the possibilities. See The Popup menu in its long form. (Figure 16). The choices are arranged in a two-tiered form near the bottom of the popup. The short form of the edit popup menu does not contain the choices that allow you to move between rows.
Row Status
Rows either reflect the contents of the database records from which they are derived, or they contain changes made by the end-user. A row that is consistent with the database record displays a plain rectangle in its edit status cell. If a row has been inserted, or some cell in an existing row has been modified, the edit status icon changes to a pencil, indicating an edit has occurred. A deleted row's edit status icon shows an X.
The constants that return the status of the current row, are
DataTableModel.INSERTED,DataTableModel.UPDATED,DataTableModel.DELETED, andDataTableModel.COMMITTED.
2.4.9 Adding a Message Dialog
When a user interaction produces a predictable but unacceptable result, or just one that you want to present some information about, you can show a message dialog window. The
MessageDialog dialog = new MessageDialog(myFrame, "Window Title", "Your message goes here");MessageDialogclass incom.klg.jclass.utilis designed for this purpose.A MessageDialog is always modal.
2.4.10 Using the Edit Popup Menu
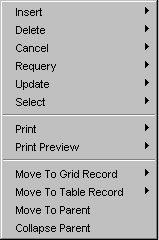
JClass HiGrid's popup menu collects a number of useful functions and organizes them for convenient access. It comes in a short and a long version, or you can customize it by building your own version.
Figure 15 : The Popup menu in its short form.
Figure 16 : The Popup menu in its long form.
The methods for customizing the popup menu are found in the
setDefaultMenuList(EditPoupuMenu.DEFAULT_SHORT_POPUPMENU_LIST)EditPopupMenuclass. Assuming you have aEditPopupMenuobject, perhaps by using thegetEditPopupMenumethod, you can choose either the short or the long versions. Use this command for the short version:Or use this one for the long version:
setDefaultMenuList(EditPoupuMenu.DEFAULT_LONG_POPUPMENU_LIST)Programmatic access to the Edit Popup is available through the
HiGridmethods shown in the following table.
2.4.11 A Cell's Data Type
A cell's data type can contain any Java data type. Additionally, a cell may contain an image. The
MetaDataModelinterface defines the Java data types that are used to map JDBC data types, which in turn mirror SQL-92 data types.
2.4.12 Sorting Columns
Columns are sorted by clicking on their headers. Repeated clicking on the column header alternates the sort order between ascending and descending. The sort algorithm checks the column's data type. The sort is lexicographic for String-based data and numeric for integer, float, and double data. Dates are sorted by first converting them to numbers.
2.5 JClass HiGrid Listeners and Events
JClass HiGrid responds to events fired from different sources, of which mouse and keyboard actions form one class.
HiGrid's controller interprets mouse and keyboard actions to decide on a course of action. For instance, a right click on a cell area brings up a popup menu.JCCellEditorEvents are a closely related class. Cell editors inform all listeners when they are finished a particular operation by posting aJCCellEditorEvent. It contains the event that originated the operation in the cell. This event (typically a key event) is interpreted by the container. The data model fires events that causeHiGridto redisplay its data based on the changing state of the database. Finally,HiGriditself is a source of events. The pertinent classes arejava.awt.event.ItemEvent,com.klg.jclass.cell.JCCellEditorEvent(extendsjava.util.EventObject),com.klg.jclass.datasource.DataModelEvent, andcom.klg.jclass.higrid.HiGridEvent.JClass HiGrid no longer relies on JClass DataSource's
DataModelEvent. Instead, it defines a JDK 1.1-style delegation event model to dispatch events to interested listeners. The base class for most of these events isHiGridEvent.Those classes interested in specific events must register themselves as listeners.
There are adapter classes for all the event classes. These classes are abstract, allowing you to override just the cases you need.
In the foregoing table, the listener method's parameter is the associated event object, for example,
beforeResizeRow(HiGridResizeCellEvent event).
2.5.1 Moving Columns
Using the JClass HiGrid model and its event mechanism is exemplified by the task of moving a column of cells. An end user may use the mouse to drag a column header from one position to another. The index labeling the column's position changes. The first two methods of the example simply print out the initial and final column indices. The code in getColumnIndex() gets the column name and the
class ViewEventsHiGridMoveCellListener extends HiGridMoveCellAdapter {Vectorof data formats for the row, then searches the data formats for the cell with the given name, thus determining the new column index.
public void beforeMoveColumn(HiGridMoveCellEvent e) {
System.out.println("Before move column index = "+ getColumnIndex(e));
}
public void afterMoveColumn(HiGridMoveCellEvent e) {
System.out.println("After move column index = "+ getColumnIndex(e));
}
public int getColumnIndex(HiGridMoveCellEvent e) {
// get the name of the column that we are interested in
String name = e.getColumn();
// get the vector of cells for this row
Vector dataFormats =
e.getRowNode().getRowFormat().getDataFormats();
// look for a CellFormat with the given name
for (int i = 0; i < dataFormats.size(); i++) {
CellFormat cellFormat = (CellFormat) dataFormats.elementAt(i);
if (cellFormat.getName().equals(name)) {
// found it!
return i;
}
}
// not found
return -1;
}
}
2.6 JClass DataSource Events and Listeners
JClass HiGrid relies on the event handling mechanism of JClass DataSource for everything related to data model events. These occur when the data being displayed by the grid is edited and committed by user action, or because one or more of the database fields currently being displayed was changed by another agent. In either case, the grid must be synchronized with the database, and data model changes must be propagated to the grid.
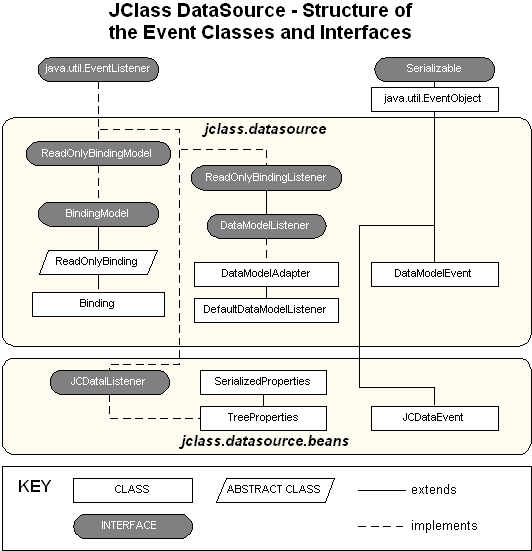
The following diagram depicts the classes and interfaces that JClass DataSource uses to manage changes to its data model. There are two listener interfaces,
ReadOnlyBindingListenerand its extension,DataModelListener, but only one event class,DataModelEvent.ReadOnlyBindingListeneris for the read-only events inDataModelEvent, andDataModelListenerextends it, adding methods for listeners that will make changes to the data model.The
ReadOnlyBindingModelinterface provides a single-level, two-dimensional view of a set of data. It groups all non-update methods and handles read-only events. This interface exists only to provide a logical separation between read-only and non-read-only methods and event handling. Update methods are declared byBindingModel.Figure 17 : Classes and interfaces related to event handling in JClass DataSource.
JClass DataSource's
DataModelEventdescribes changes to the data source. An interested listener can query this data source to reflect the changes in its display.DataModelEventdefines these methods:Events are characterized by the class constants given in the following table. Listeners can distinguish various cases within the event structure by examining these constants and taking the appropriate action. Some of these constants are for rare situations, or for internal use. These are the minimum to which a listener should respond:
AFTER_CHANGE_OF_ROW_DATA
AFTER_INSERT_ROW
AFTER_DELETE_ROW
AFTER_RESET
AFTER_REQUERY_ROW_AND_DETAILS
AFTER_MOVE_TO_CURRENT_ROWSee the
DataModelEventAPI and the following table for the full list of event constants.
2.6.1 The Class Constants Defined in DataModelEvent
Applications that simply need to display a grid find that all event handling is done transparently. Events do need to be caught and handled by applications that need to inspect and possibly deny some of the actions that end-users may take. The "BEFORE" events shown in the table below can be used to let your application inspect changes made by the end-user and perform its own validation before passing them back to the data source.
The data model's events are distinguished by the group of class constants listed here:
DataModel Event Class Constants and Corresponding Listener Method
Description
A row has changed, re-read all its cells and its status to reflect the new values. If this event is the result of a cell edit, call
DataModelEvent.getColumn()to get the name of the column which changed. IfgetColumn()returns " ", re-read the entire row.Called when one of the following is
true:a row is deleted and getShowDeletedRows() == truea cell was edited row edits are cancelled and getRowStatus == UPDATEDrow edits are cancelled and getRowStatus == DELETEDandgetShowDeletedRows == truerow is committed and getRowStatus == UPDATEDorINSERTEDrow is requeried and getRowStatus != INSERTEDRemoves the row from the display. A row has been physically deleted and needs to be removed from the display or has been logically deleted but the
showDeletedRowsproperty has been set tofalse. Called whena row has been logically deleted and getShowDeletedRows == falserow changes have been cancelled and getRowStatus == INSERTEDa row is committed,
getRowStatus == DELETED, andgetShowDeletedRows == truea row has been requeried and getRowStatus == INSERTEDA new row has been added to the datasource. Listeners need to display the row. Rows are always added to the end of
DataTableModels.The global cursor has moved to a new row. Listeners should position their cursor on the indicated row. In a master-detail relationship, child levels should refresh themselves to reflect data sets which correspond to the new parent row by calling
DataModel.getCurrentDataTable()or, for field controls,DataModel.getCurrentDataItem().Re-reads the indicated row and refreshes all open children under this row.
Re-reads this table and refreshes all open children in the table.
Listeners must close all expanded views and reset/re-read the root node. The previous pointer to the root node is no longer valid. Call
DataModel.getDataTableTree().getRoot()for the new root table. Called when the datasource has been reset.These "BEFORE_" events can be ignored. They are simply to allow applications to cancel the event.
Event fired before all changes are cancelled. Can be cancelled.
AFTER_INSERT_ROWandAFTER_CHANGE_OF_ROW_DATAevents can follow this event.Event fired before all edits to a row are undone. Can be cancelled. An
AFTER_DELETE_ROWorAFTER_CHANGE_OR_ROW_DATAevent will follow.See
DataTableModel..
cancelRowChanges()Event fired before all changes are committed. Can be cancelled. All modified, deleted and inserted rows at all levels are about to be committed.
BEFORE_DELETE_ROWandAFTER_CHANGE_OF_ROW_DATAevents will follow depending on the operations performed on the modified rows being saved. Results from a call toDataModel.updateAll().Called when the root-level bookmark for a subtree changes. When this happens, those nodes in the previous subtree which are not
COMMIT_MANUALLYare committed. Can be cancelled. If cancelled the cursor moves but the changes are automatically committed.Called before single row is committed to data source. Can be cancelled, in which case the row edits are not written to the datasource and the rows status remains modified.
AFTER_DELETE_ROWorAFTER_CHANGE_OF_ROW_DATAevents will follow depending on the status of the row to be committed.Event fired before a row is [logically] deleted. Can be cancelled. If not cancelled, this event will be followed by an
AFTER_ROW_DELETEor aROW_STATUS_CHANGEDmessage if the commit policy isCOMMIT_MANUALLYorCOMMIT_LEAVING_ANCESTOR.See
DataTableModel.deleteRow(),MetaDataModel.getCommitPolicy().The indicated Data Table will be deleted and flushed from the cache. Can be cancelled.
Event fired before a row is inserted. Can be cancelled. If not cancelled, this event will be followed by an
AFTER_INSERT_ROWevent.Event fired when either
DataTableModel.requeryRowor
AndDetails()DataTableModel.requeryRow()is called. If not cancelled, this event will be followed by an,AFTER_REQUERY_ROW_AND_DETAILSevent, anAFTER_ROW_DELETEevent in the casegetRowStatus() == INSERTED, or aROW_STATUS_CHANGEDevent in the casegetRowStatus() == UPDATEDorCOMMITTED.See
DataTableModel.requeryRow(),DataTableModel.requeryRowAnd.
Details()Event fired before entire grid is reset. Can be cancelled. If not cancelled this event will be followed by an
AFTER_RESETevent. This event will result from a call toDataModel.requeryAll().Notification that multiple events are coming. Multiple events will be nested between
BEGIN_EVENTSandEND_EVENTSevents. Allows listeners to treat the events as a batch to, for example, reduce repaints.Notification that multiple events are complete. Multiple events will be nested between
BEGIN_EVENTSandEND_EVENTSevents. Allows listeners to treat the events as a batch, to, for example, reduce repaints. Called whenDataModel.updateAll()is called.The current row has been deleted and the originator of the deletion should now reposition the global cursor to a new, valid row.
The grid's events extend
java.util.EventObjectand are defined in subclasses ofHiGridEvent. They are categorized by the group of class constants listed next.Use the methods in the following table to glean information about the type of event that was generated. Since JClass HiGrid receives events from the data source as well, method
isDataModelEventpermits you to find out whether the event comes from HiGrid itself or is simply being passed on. Use methodisCancelable()to confirm that your application can actually intervene in the processing of the event. Most "BEFORE" events are cancellable.
2.6.2 Print Events
A
HiGridPrintEventis issued for each page when printing is in progress so that you can add custom headers and footers, and possibly do some post-processing when the print job finishes. The relevant constants areHiGridPrintEvent.PRINT_END,PRINT_FOOTER, andPRINT_HEADER.
2.6.3 Validating Events
HiGridValidateEvent's three constants areSTATE_IS_INVALID,VALUE_CHANGED_BEGIN, andVALUE_CHANGED_END. JClass HiGrid's style of validation uses these methods to fire the events:fireValueChangedBegin,fireValueChangedEnd,fireStateIsInvalid, andfireValidateEvents. The methodfireValidateEventsis in the support class (jclass.cell.ValidateSupport), since it is called by all JClass editors. UseHiGridValidateEvent.getValidateEventto see which event subclass is involved.
2.6.4 Data Model Events
JClass HiGrid encapsulates data model events so that it can inspect all events before passing them on.
2.6.5 Mouse and Keyboard Events
The controller implements the following keystroke combinations:
Mouse Actions
Besides traversing the grid by using the horizontal and vertical scrollbars, and selecting a cell for editing with a left mouse click, a right mouse click provides two popup menus, depending on the location of the mouse pointer when the event occurs. On a cell that is open for editing, the standard edit popup appears. On any other location in the grid, the JClass HiGrid edit popup menu appears.
Figure 18 : JClass HiGrid's right-click popup menu.
2.7 Printing a Grid
Printing an image of the grid is facilitated by classes
PrePrintRowTreeWalk,PrePrintWalk,PrintGrid, andPrintWalk.The Print function is one of the choices in the popup menu that is accessed by a right-click anywhere within JClass HiGrid's grid area. There are two further choices, print As Displayed and print As Expanded. The latter choice prints the entire grid while the former prints just those rows that have been expanded. All rows of the root table are always printed, not just those that are visible in the grid window. If a sub-level is exposed anywhere and the
PRINT_AS_EXPANDEDoption is chosen, all related sub-levels are printed.You can access a limited number print routines programmatically as well. To initiate printing programmatically, use
HiGrid's no-argumentsetPrintFormatwith either of the parametersHiGrid.PRINT_AS_DISPLAYEDorHiGrid.PRINT_AS_EXPANDEDto set the type of printing desired.
2.7.1 Printing Headers and Footers
To print grid information and include a page header and a page footer, add a print listener and process two of the three types of
HiGridPrintEvent.These arePRINT_FOOTER, andPRINT_HEADER. The other case isPRINT_END, which signals the end of the print job. You can listen for this event if you want to do any clean-up after printing.An example of code that might be used for a footer is included here. It is used by the print routine to produce the default footer. Assuming you have set the page margins elsewhere, the graphics context is used to get the clip bounds for the footer rectangle. You could replace the variable
/**height/2 with some other value, but you must ensure that it is within the bounds defined by the rectangle or you won't see anything.
* Prints default footer.
*/
public void printPageFooter(HiGridPrintEvent event) {
Graphics gc = event.getGraphics();
Rectangle r = gc.getClipBounds();
Font font = grid.getFont();
if (font != null) {
gc.setFont(font);
String page = "Page " + event.getPage() +
" of " + event.getNumPages();
gc.drawString(page, 0, r.height/2);
}
}
2.7.2 Print Preview
The
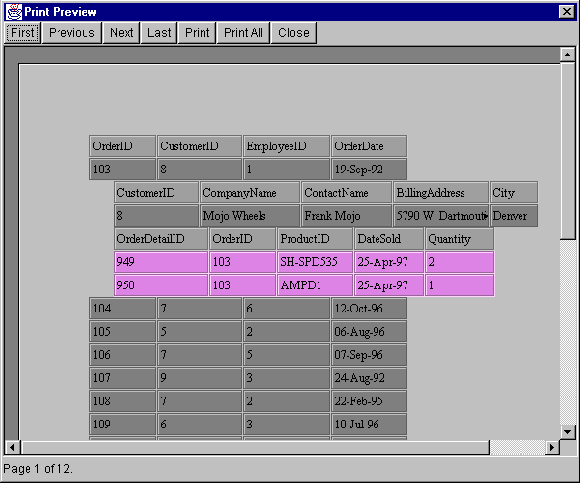
EditPopupMenuincludes a Print Preview. It also has the As Displayed... and As Expanded... sub-choices. Choosing one of these brings up a Print dialog, but clicking on OK causes a print preview window to appear rather than initiating an actual print job. An example of the Print Preview window is shown next. It contains buttons First, Previous, Next, and Last for selecting pages, and buttons Print and Print All remove the necessity of closing this window and then choosing Print to begin an actual print job. Use the Print Page button to print the current page, and use Print All to print the entire grid.
Figure 19 : The Print Preview window, showing its navigation and control buttons.
2.7.3 PrintGrid and its Associated Classes
These classes are used internally by HiGrid to implement its print function. Apart from using the methodology of the previous section to provide customized headers and footers, or to do some clean-up at the end of a print job, no other use of these classes is recommended.
|
|